Hướng dẫn cài đặt LAMP trên Ubuntu
Trong bài này, chúng tôi sẽ hướng dẫn cho bạn cách cài đặt một hệ thống LAMP. LAMP bao gồm Linux, Apache, MySQL, PHP. Hướng dẫn này chủ yếu dành cho những người chỉ có một chút kiến thức trong việc sử dụng Linux.
Cài đặt Apache Để bắt đầu chúng tôi sẽ hướng dẫn cài đặt Apache. 1. Mở phần Terminal (Applications > Accessories > Terminal) 2. Copy/Paste dòng mã sau vào Terminal và nhấn phím enter: sudo apt-get install apache23. Terminal sẽ hỏi mật khẩu của bạn, nhập nó vào và nhấn enter. Kiểm tra Apache Để chắc chắn mọi thứ đã được cài đặt chính xác, chúng ta sẽ tiến hành kiểm tra Apache để đảm bảo nó hoạt động đúng cách. 1. Mở trình duyệt và sau đó nhập địa chỉ web sau đây vào ô địa chỉ: http://localhost/2. Bạn sẽ thấy một thư mục có tên là apache2-default/. Mở thư mục đó ra, bạn sẽ nhận được thông báo là “It works!” và bạn đã thành công. Cài đặt PHP Tiếp theo chúng ta sẽ tiến hành cài đặt PHP 5. Bước 1: Mở lại phần Terminal (Applications > Accessories > Terminal) Bước 2: Copy/Paste dòng lệnh sau vào Terminal và nhấn enter: sudo apt-get install php5 libapache2-mod-php5Bước 3: Hợp lệ để PHP làm việc và tương thích với Apache và chúng ta phải khởi động lại nó. Nhập vào câu lệnh sau trong Terminal để thực hiện điều này: sudo /etc/init.d/apache2 restartKiểm tra lại PHP Để đảm bảo không có vấn đề gì phát sinh đối với PHP, hãy kiểm tra lại nó bằng các bước sau: Bước 1: Trong Terminal, copy và paste dòng lệnh sau rồi nhấn enter: sudo gedit /var/www/testphp.phpCâu lệnh này sẽ mở một file có tên là phptest.php. Bước 2: Copy/Paste dòng lệnh sau vào file phptest: Bước 3: Lưu và đóng file lại Bước 4: Mở trình duyệt web của bạn và nhập vào địa chỉ sau: http://localhost/testphp.phpBạn sẽ thấy giao diện sau: 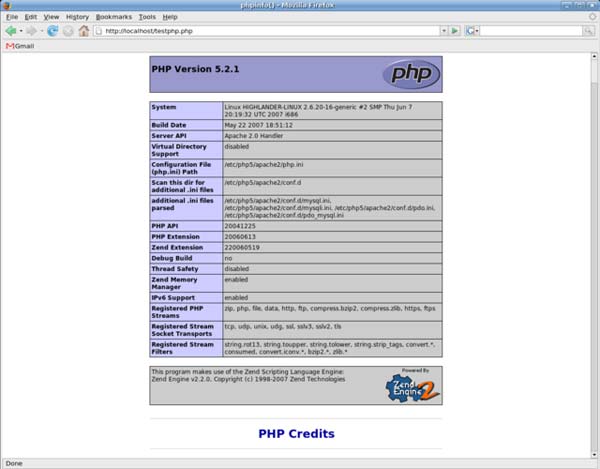 Cài đặt MySQL Cuối cùng là việc cài đặt MySQL Bước 1: Lại tiếp tục mở lại Terminal và đưa vào dòng lệnh sau: sudo apt-get install mysql-serverBước 2 (không bắt buộc): Để các máy tính khác trong mạng xem được server mà bạn đã tạo, đầu tiên là bạn phải chỉnh sửa “Bind Address”. Bắt đầu bằng việc mở Terminal để sửa file my.cnf. gksudo gedit /etc/mysql/my.cnfTại dòng bind-address = 127.0.0.1đổi địa chỉ 127.0.0.1 thành địa chỉ IP của bạn Bước 3: Đây là bước quan trọng, nhập dòng lệnh sau vào Terminal: mysql -u rootVà copy/paste dòng lệnh sau: mysql> SET PASSWORD FOR 'root'@'localhost' = PASSWORD('yourpassword');(Hãy thay đổi yourpassword bằng mật khẩu mà bạn chọn) Bước 4: Giờ chúng ta sẽ tiến hành cài đặt chương trình phpMyAdmin, đây là một công cụ đơn giản để chỉnh sửa cơ sở dữ liệu của bạn. Copy/paste dòng lệnh sau vào Terminal: sudo apt-get install libapache2-mod-auth-mysql php5-mysql phpmyadminSau khi đã cài đặt mọi thứ, bước tiếp theo cần thực hiện là làm cho PHP có thể làm việc cùng với MySQL. Để thực hiện điều này, chúng ta cần mở file php.ini bằng cách nhập vào dòng lệnh sau: gksudo gedit /etc/php5/apache2/php.iniTrong file này, chúng ta cần bỏ dấu chú thích ở dòng lệnh sau bằng cách bỏ đi dấu chấm phẩy đầu dòng (;): ;extension=mysql.soThay đổi nó thành như sau: extension=mysql.soGiờ thì bạn có thể khởi động lại Apache và hoàn thiện toàn bộ quá trình cài đặt! sudo /etc/init.d/apache2 restart |
What is LAMP? It is Linux, Apache, MySQL and PHP.
LAMP (software bundle), the open source web platform consisting of Linux, Apache, MySQL, and PHP Why would you want to use it? You use Linux as your preferred OS. Linux is perfect for server applications: you can run a web server called Apache 2, a database system called MySQL and a scripting language PHP to make your web pages interactive. You can install LAMP using visual tools, but it is more fun and more control when using Terminal. I will show you how: Install LAMP I presume you have Ubuntu Linux installed. Let’s install everything else (Apache 2, PHP5 and MySQL 5) at once sudo aptitude install apache2 mysql-server php5 php5-mysql libapache2-mod-php5 It is that simple! Now we have a web server, a database and PHP running. Open your favourite web browser and enter http://localhost (or http://127.0.0.1). You should see a page with a folder contents. Since we did not put any web pages in the standard catalogue, we won’t see a web site - yet. Check if Apache 2 and PHP 5 work fine Create a file called test.php and enter this text in it Save the file and copy it to your web site folder, e.g. /var/www Open your web browser and run http://test.php Control Apache 2 To start Apache 2 sudo /etc/init.d/apache2 start To restart Apache 2 sudo /etc/init.d/apache2 restart To stop Apache 2 sudo /etc/init.d/apache2 stop After first install I always get this error: It is easily fixed - add ServerName localhost into apache2.conf gksudo gedit /etc/apache2/apache2.conf You can change lots of things in Apache2.conf configuration file. For example, enable Apache modules, set the default encoding to CP-1251 or change localhost default location. Secure Apache Do you want to run Apache only to test your web site? Then you can ask it to listen only to particular port. For example, I want Apache to answer only my local web site (at 127.0.0.1 and port 8080) So I add Listen 127.0.0.2:8080 to ports.conf sudo nano /etc/apache2/ports.conf Save the file. Reboot or restart Apache. Apache will only serve your web site if you type http://127.0.0.2:8080 Control MySQL To start MySQL sudo /etc/init.d/mysql start To restart MySQL sudo /etc/init.d/mysql restart To stop MySQL sudo /etc/init.d/mysql stop Create MySQL users/databases Whether you use your database for testing purposes or in production machine, you should not use “root” user in MySQL all the time. First, you need to create a password for the “root” user to make your system more secure. $ mysql -u root set password for root@localhost = password('YOURROOTUSERPASSWORD'); flush privileges; quit; After this, you can login into MySQL prompt by mysql -u root -p You also need to use a different user and different database for each application that uses MySQL. For example, I create different users that use different MySQL databases for Amarok (keeping music database) and WordPress (local web copy of Siberian.Ws). $ mysql -p -u root create database wordpress; use wordpress; grant all on wordpressadmin.* to wordpress@localhost identified by 'PASSWORDFORWORDPRESSDATABASE'; flush privileges; quit; If you do not want to make the user all-powerful, use a command similar to grant select, insert, update, delete, create, drop, alter on YOURDATABASE.* to YOURUSERNAME@localhost identified by 'YOURPASSWORD'; Look at MySQL tutorial what privileges should be set for your user. localhost is the default host, but if you add virtal hosts, you may want to change it to, say, siberian. It depends on your hosts file, really. Playing with MySQL Enter MySQL commands in the prompt until you feel good. MySQL commands can be typed on one or several lines. To end the command and execute it, finish the command with ; like mysql> drop database amarok; To leave MySQL prompt type quit; If you prefer the visual way of controlling MySQL, then you can either user phpMyAdmin (control databases via web interface) or mysql-admin or official MySQL Administrator.  sudo aptitude install mysql-admin phpmyadmin sudo aptitude install mysql-admin phpmyadminTo run myPHPAdmin, type in the address bar of you browser http://localhost/phpmyadmin/ Creating web content We do have a web server running which does not mind processing PHP. However, the address http://localhost/ by default points to /var/www. That folder is basically empty that is why you do not see much in your web browser. To show proper web site, you need to put some web pages in that folder. First, allow yourselft to have access to the folder /var/www sudo chown -R USERNAME /var/www Now, you can copy your great web site to the folder /var/www. Start Firefox again and type http://localhost/. Do you see you web site? If you hate to always navigate to /var/www, you can press Control-D in Nautilus to add a new bookmark in Places menu. You can create a link to it in your home folder for easy access, alternatively. ln -s /var/www ~/WebSite Of course, do not forget to create folder WebSite. Now you can place all your web content inside the folder WebSite in your home folder and you will see your web site by going to http://localhost/ Using virtual hosts I love running different web sites on one machine. If I put a folder called siberian inside /var/www, I can run my local web site by entering http://localhost/siberian. However, I prefer more human-readable web addresses. For example, when I enter http://siberian, my local WordPress copy of Siberian.Ws (located in /home/andrei/Web Sites/siberian) runs in Firefox. When I enter http://olga, I get plain copy of http://www.art-od.net (located in /home/andrei/Web Sites/olga). It is good for testing my web sites locally. To use virtual hosts, you need to change hosts file and add some information for Apache. First, I add my virtual host address to Hosts file sudo nano /etc/hosts 127.0.0.1 siberian 127.0.0.2 olga Then I reboot the computer or networking for changes to take effect sudo /etc/init.d/networking restart Now I want to setup the virtual hosts themselves. Let’s do SIBERIAN as an example  I open Nautilus in root mode (press Alt-F2 and enter sudo nautilus). I open Nautilus in root mode (press Alt-F2 and enter sudo nautilus). I create a copy of file default which is located in /etc/apache2/sites-available and rename it to siberian. I create a copy of file default which is located in /etc/apache2/sites-available and rename it to siberian. I create a link to this file by right-clicking on it. I create a link to this file by right-clicking on it. I copy this link to /etc/apache2/sites-enabled I copy this link to /etc/apache2/sites-enabled I change siberian: I change siberian:NameVirtualHost * is changed to NameVirtualHost siberian ServerName siberian is added under ServerAdmin DocumentRoot /var/www/ is changed to DocumentRoot /home/andrei/Web Sites/siberian |
| Múi giờ GMT +7. Hiện tại là 12:05 PM |
© 2008 - 2025 Nhóm phát triển website và thành viên SANGNHUONG.COM.
BQT không chịu bất cứ trách nhiệm nào từ nội dung bài viết của thành viên.